Arriving in Israel
Travelling to a foreign country can be challenging, especially for the first time.

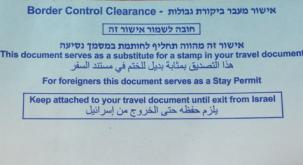
When you go through customs, you will receive a blue paper card, not a stamp. This is because having an Israeli stamp in your passport makes it difficult to travel to other countries due to Israel's position on the world stage. KEEP THE BLUE CARD. Take a picture of it. Carry it with you whenever you take your passport somewhere. If you are leaving the country, you will need the card. If you lose it, you can get a new one by going to Ben Gurion Airport-- they have an office that replaces them.

Getting through customs is relatively easy, but it will take time. The lines at Ben Gurion Airport, in true Israeli fashion, are more mobs than straight lines. Try to choose the one that's moving the fastest, and know your address, your supervisor's name, and have your passport ready to hand to the official. If you have a letter from MISTI, it's a good idea to have that on-hand, too. The official may only ask a few questions, but they may also ask quite a few; be prepared.
The Ben Gurion Airport Experience
Israeli law mandates that, once all aircraft enter Israeli airspace, passengers must remain seated. For instance, restroom privileges may be revoked for the last thirty minutes of the flight in order to comply. Plan ahead, and don’t get caught in the last-minute rush.
Customs are easy to get through, but be careful to pick a line that moves quickly. Don’t be intimidated by the fact that the “lines” look less like organization and more like a mob. Be patient; you’ll get through eventually. You only need to show them your passport and answer any questions they might have.
IMPORTANT: When you go through customs, you will receive a blue card instead of a stamp. KEEP THIS CARD. Whenever you travel with your passport, take this blue card with you. Take a picture of it; you should already have a picture of your passport and your student visa, if you received one.
Directly after customs is baggage claim. There is a central monitor that lists which flight is at which carousel.
After grabbing bags, exit the airport. There will be signs for trains—follow those. Right before exiting the airport to go to the trains, there is a kiosk on the outer wall to exchange money. The airport pays a low rate and takes a fee; don’t exchange more than $40 here, as long as you have an international credit card. You will easily be able to get to your apartment/dorm/home with that amount of money.
If you need to travel by train, they can be found after exiting the airport, and the ticket kiosk is on the left. For the most part, trains run every half hour. A paper ticket will be printed; enter this at the gates to access the platforms. You will have to take an elevator down to the platforms. If you have luggage, do NOT use the escalator. Before you step on the elevator, there is a monitor that displays when trains are leaving and from what platform (there are only 2.)
Once the train arrives, be assertive. People are pushy to get on, and they don’t like lines. There are cars with tables and cars with only seats—if you have luggage, sit in one that doesn’t have the tables (they take up space.) Be advised that the train will most likely start off fairly empty, but will quickly fill up, especially with soldiers.
The trains have wi-fi, although it is slow, and outlets to charge things, but only in some cars. Have an adaptor in your carry-on/ easily accessible for this reason.
The trains have announcements before each stop, but sometimes they’re hard to understand. They have digital signs that display the name of the station, both in Hebrew and English. You can also track your train via the Israel Railways app.

